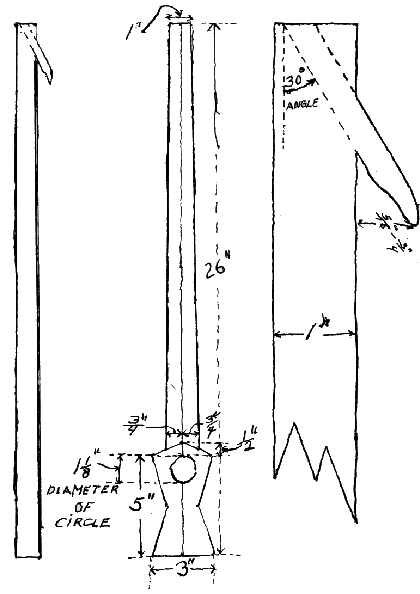
I made this after seeing a picture of it on the internet and figuring out the dimensions on my own.
Since then, I've found other plans for it and am amazed at how close I came.
Material:
Wood, 24" x 2 1/2" x 3/4"
3/8" dowel, 2 1/2" long
Sinew or Cordage
Construction:
- Cut out the basic shape. You can taper the back of the shaft as well, if you want.
- Drill a 1" fingerhole in the center as shown.
- Round off all the edges and sand.
- Cut one end of the dowel at a 60 degree angle, then round/taper the other end.
- Glue and wrap the peg. Let it dry for a few hours before using.

More information can be found on Chris Oberg'swebsite, and a desciption of a contest with this type of atlatl can be found in the University of Vermont'sSummer 2004 newsletter (also reprinted here on my site with the author's permission, in case the original gets moved and lost).
From "Whittlin', Whistles, and Thingamajigs"
 | Material: Seasoned wood 26 1/2" long, 3" wide, 1 to 1 1/8" thick 3/8" dowel, 3" long Construction:
|

Based on an ancient Aztec atlatl.
Material:
Wood, 24" x 1 1/2" x 1/2"
Dowel, 1/4" x 2 1/2"
Construction:
- Cut a 1/4" x 1/4" square groove down the center of the board.
- Shape the atlatl -- 14" from the peg end, it should be 1 1/4" wide, tapering to 7/8" at the handle end. (The 14" was originally covered by carvings.)
- Round the bottom of the atlatl per the cross-section picture.
- Slope the sides of the groove per the cross section picture, starting 2" from the peg end.
- Round the edges of the atlatl and round off the peg end.
- Sand and smooth the board.
- Taper/round one end of the dowel and glue it in place. It will lie completely in the groove.
The article about this atlatl can be found athttp://www.msu.edu/~oberg/articles/double/twoancient.html.

Based on an ancient Aztec atlatl, most likely ceremonial (although I would like to try throwing with it).
Material:
Wood, 23" x 1 3/8" x 3/4"
(2) Dowels, 1/4" x 2"
Construction:
- Cut 1/4" x 1/4" square grooves down the board, leaving 1/8" in the center for a spacer.
- Shape the atlatl. It's a steady taper.
- Round the bottom of the atlatl per the cross-section picture.
- Round the edges of the atlatl and round off the peg end.
- Sand and smooth the board.
- Taper/round one end of the dowels and glue them in place. They will lie completely in the groove.

Articles about this atlatl can be found athttp://www.msu.edu/~oberg/articles/double/twoancient.html andhttp://www.msu.edu/~oberg/articles/double/aztec.html.

Still used for fishing in Mexico today.
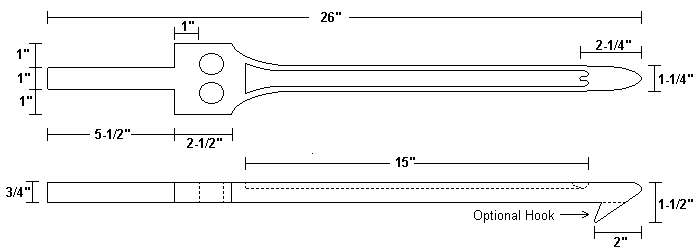
Material:
Wood, 26" x 3" x 3/4"
Construction:
- Cut out the outline (handle and shaf)
- Starting 2 1/4" from the peg end, cut the groove 3/4" wide by 1/4" deep with a rounded bottom. Continue for 15", flaring the end out on the grip.
- Carve out the peg and extend the groove around it.
- Drill the fingerholes. Use 1" holes for larger fingers, 3/4" holes for smaller ones. Leave about 3/8" between them.
- Round off the bottom of the shaft.
- Round off the edges and sand smooth.
The original ones have a hook on the bottom. This is used to retrieve the fishing line and dart. If you want to make this style, you have two options.
- Start with a 1 1/2" thick board instead of a 3/4" board. Follow the steps above and after drilling the fingerholes, remove the bottom 3/4" of the board back to where the hook starts. Carve out the hook and continue.
- Cut out a 2" x 1 1/4" x 3/4" piece of wood. Follow the steps above and after drilling the fingerholes, glue and clamp this block under the peg end. When dry, carve out the hook and continue.

An article about this atlatl can be found athttp://www.msu.edu/~oberg/articles/duck/hunt.html.
Atlatl Designs | Home
Atlatl eli vipukeihäs
Vipukeihäs on hyvin vanha ase, jossa on kaksi osaa heitinpuu ja keihäs. Kivikauden metsästäjät ovat käyttäneet sitä jopa mammutin metsästyksessä. Tarinat kertovat myös, kuinka espanjalaiset conquistadorit pelkäsivät atsteekkien vipukeihäitä, jotka helposti lävistivät heidän varusteensa. Vipukeihästä tarkoittava englannin sana 'atlatl' tuleekin atsteekkien kielestä. Atsteekkien lisäksi jotkut intiaaniheimot, eskimot ja Australian aboriginaalit ovat käyttäneet vipukeihästä viimeisen viidensadan vuoden aikana. Vipukeihään heitosta myös kilpaillaan nykyisin ympäri maailmaa, tosin lähinnä Amerikan valtaväestön ja eurooppalaisten keskuudessa.Vipukeihästä heitettäessä taipuisa ja ohutvartinen keihäs asetetaan heittokädessä olevaan heitinpuun okaan tai uraan. Heitinpuu toimii tavallaan käden jatkona lisäten siten huomattavasti keihään lähtönopeutta ja siten myös iskuvoimaa. Vipukeihäs onkin maailman ensimmäisiä superaseita. Harjaantuneen käsissä se on myös yllättävän tarkka.
Heiton pituus yleensä yllättää ensimmäistä kertaa heittävän, samalla kun harjaantumaton voi epäonnistuessaan heittää vähän minne sattuu. Osuessaan keihäs voi saada aikaan suurta vahinkoa. Siksi vipukeihäällä heitettäessä, aivan kuin muidenkin aseiden kanssa, on huolehdittava riittävästä turvallisuudesta. On olemassa kaksi perussääntöä, joita on ehdottomasti noudatettava:
- Keihästä ei saa heittää ketään kohti.
- Lähellä olevien ihmisten on oltava selvästi heittäjän selän takana, eikä missään tapauksessa maalialueella.
Heitinpuun tekeminen
 Sopivasta lankusta sahataan ja veistetään kuvan 1. kaltainen heitinpuu. Sen mitat ovat hyvin henkilökohtaiset. Varren paksuus voi olla 3 - 4 cm. Pituus taas 60 - 90 cm. Mitä pidempi heitinpuu sen kovempaa keihäs lähtee ja sitä pidemmälle se lentää, mutta toisaalta sitä raskaampaa, vaikeampaa ja epätarkempaa heittäminen on.
Heitettäessä peukalo ja keskisormi asettuvat käden sijan kapeimpaan kohtaan. Heiton alkuvaiheessa keihästä pidetään paikoillaan peukalon ja keskisormen avulla. Etusormi koukistetaan reiän läpi. Kädensijan kapeimmasta kohdasta pitää siis tehdä niin kapea, että keihään piteleminen onnistuu mukavasti. Reikä taas pitää olla niin kaukana kapeasta kohdasta, että heitto-otteesta tulee tukeva ja mukava. Kädensijan suurin leveys voi olla 5 - 6 cm ja pituus kymmenisen senttiä.
Oka tehdään ohuesta pyörörimasta: veistetään kuvan 1. mukainen kärki, joka sopii keihään tyvipäässä olevaan koloon. Kärkeä kannattaa kuumentaa tulessa niin, että pinta hieman hiiltyy. Kuumentaminen tekee puusta huomattavasti kovempaa ja kestävämpää. Kuumennuksen jälkeen oka siistitään. Heitinpuuhun porataan okaa varten reikä 30°- 45° kulmaan. Reiästä kannattaa tehdä tiukka. Lopuksi oka liimataan paikalleen niin, että siitä jää näkyviin 3 - 4 cm. Jos reiästä tulee liian löysä voi kiinnitystä kiristää pienten puukiilojen avulla. Lopuksi voi heitinpuuta vielä viimeistellä ja koristella kunkin haluamalla tavalla.
Keihään tekeminen
Lähteestä riippuen keihään on sanottu voivan olla pituudeltaan 70 - 200 cm ja halkaisijaltaan 0,5 - 3,0 cm. Käytin itse 180 cm pitkää ja 1,2 cm paksua pyöreää mäntyrimaa, joka sopi keihään varreksi hyvin.
Varsi
Jos varsi on erittäin väärä, voi sitä yrittää suoristaa lämmittämällä puuta tulen yllä ja sitten taivuttamalla puuta suoraksi. Keihään pää teroitetaan ja tyvipäähän koverretaan okaa vastaava kolo. Kärjen ja tyven kovettamiseksi molempia päitä poltetaan tulessa niin, että puun pinta aavistuksen verran hiiltyy. Lopuksi viimeistellään kärki ja tyven kolo ja raaputetaan puukolla hiiltynyt pinta pois.

Sulitus
Sulituksen tarkoitus on saada keihäs pyörivään liikkeeseen ja siten parantaa sen lentoa ja osumatarkkuutta.

Aluksi valitaan kolme suurehkoa saman puoleisen siiven sulkaa. Keihään sulituksen pituuden pitäisi olla 10 - 15 cm keihään pituudesta riippuen. Sulat halkaistaan keskiruodon uraa pitkin ja. Puukon kärjellä kaavitaan ruodosta valkoinen ja pehmeä keskiosa pois. Sulista valitaan siisti sopivankokoinen pala ja katkaistaan ylimääräiset osat tyvestä ja kärjestä pois. Sulan palojen molemmista päistä leikataan höytyvät pois 1 - 2 cm matkalta. Sivellään liimaan sulkien ruotoon. Sulat asetetaan kuminauhojen avulla paikalleen yhtä kauaksi toisistaan (ks. kuva 3).

Sulat kiinnitetään varsinaisesti langan avulla. Lanka kierretään keihään ympäri. Kiertäminen aloitetaan sulkien tyvipäästä edeten kohti keihään perää (ks. kuva 4). Langan kiertäminen aloitetaan esimerkiksi tukkikytkyllä (ks. kuva 5). Lanka kierretään tasaisesti vieriviereen. Kun sulkien tyvi on tarpeeksi tiukasti kiinni katkaistaan tyvessä oleva kuminauha. Kun sulantyvi on kierretty täyteen päätetään rihmaus kuvan 6 mukaisesti. Kiertämistä jatketaan harvasti sulkahöytyvien lävitse. Höytyvien loppuun päästessä poistetaan keihään perässä oleva kuminauha. Lanka kierretään vielä tiukasti loppuun asti ja päätän rihmaus (ks. kuva 7). Lopuksi sivellään lanka ja sulkien välit liimalla rihmauksen vahvistamiseksi. Keihäs on käyttövalmis kun liima on kuivunut.

Lähteitä:
Aaltonen, Turkka ja Arkko, Martti 1997. Vanhat hyvät erätaidot. Hämeenlinna: Karisto
Fagan, Michel. The Mayan Atlatl.http://www.crl.com/~mjr/stick5.html
Callahan, Kevin L. 1997. How to use an atlatl (or spearthrower).http://www.geocities.com/Athens/Acropolis/5579/atlatl.html
Bailey, Ted The Atlatl. http://users.aol.com/tbprim1/Atlatl.html
World Atlatl Association. http://www.worldatlatl.org/
6. kesäkuuta 2000 Janne Kurra
THE MAYAN ATLATL
From the article
Target Practice With Mayan Throwing Sticks
By Clark H. Rutter
Popular Science Monthly, August 1935Transcribed and illustration imaged by thrower list member Michael Fagan
 Here is a fascinating sport that requires little equipment and is quickly mastered - hurling arrows at a target with a homemade hul-che, or Indian throwing stick.The hul-che was one of the weapons used by the ancient Mayas in Yucatan and other parts of Mexico and Central America. It is merely a stick with a protruding head or peg, which engages the end of an arrow. By means of the stick, the arrow can be thrown great distances, with surprising force and accuracy. Unlimited skill may be gained by practice; the exercise is a healthful one; and the sport becomes highly competitive when engaged in by a group.
The sticks illustrated are not copies of authentic Mayan designs, but represent a few of the many types that may be easily fashioned.
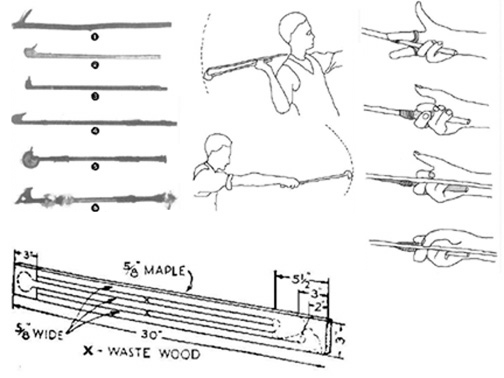
In the photograph at the left, showing a group of six sticks, No. 1 is made from the forked branch of a tree. The smaller branch is burned off to harden and round it so that it serves as a peg. The second stick is whittled from white pine, and the peg is a wood screw, which is rounded with a file after the head has been cut off. Slightly more elaborate is No. 3. It has an ebony peg, and there is a dowel peg through the handle for a finger rest. Cord is wrapped around the stick in two places for decoration.
Still better are the sticks marked Nos. 4, 5, and 6. These are made of maple and have turned ebony, bone, or maple pegs. They are painted in various colors and decorated with cord wrappings, leather fringes, and feathers, and have leather loops for the fingers. All three sticks can be cut from a piece of maple 5/8 by3 by 30 in., as shown in the diagram near the end of this article. The stock for the handles is 5/8 in. square. The heads may be cut to any desired design and the handles rounded off and dressed down to about ½ in. round. The sticks are then sanded, stained, and polished.
The peg in each case is about 1/4 in. in diameter, with a ball formed on the end. A ball will follow the concave socket in the arrow through a greater length of stroke than a plain, straight point. The peg may be set at any from 45 to 80 deg.
Glue the peg in a hole drilled in the head. Attach the finger loops and decorations with wrappings of cord such as chalk line. Pull the ends through under the wrappings to avoid knots. The wrappings may be stained with water colors and shellacked when dry.
Although arrows from 28 in. to 5 ft. in length may be used, the standard 28-in. target or hunting arrows obtainable at any sporting-goods store are probably the most practical. It is necessary merely to cut off the nock and form a round concave socket to match the end of the peg. If you wish to make your own arrows, you will find instructions in any standard book on archery.
The method of gripping the stick is illustrated in the accompanying series of four photographs. The second, third, and fourth fingers grasp the handle, while the first finger is folded up out of the way. Place the arrow socket on the peg and lay the shaft along the first joint of the second finger, holding the shaft in place with the thumb. Use only enough pressure to keep it from falling off.
Stand with the feet apart, the left foot forward and pointing toward the target, the right foot back and at right angles to the left, unless, of course, you are a left-handed thrower, in which case the position is reversed.
Draw the stick with the arrow in place straight back over the shoulder and execute a straightforward overhand swing. At the finish of the stroke, rock up on the right toes. Do not try to release the arrow with the thumb, as it is not necessary. If the thumb is pressed lightly against the arrow, but not lapped entirely over the top, the release will take place without conscious effort and at exactly the right time.
The throwing stick is by no means a toy. It has a range up to 500 ft., and the power is sufficient to inflict serious injuries. Use the same precautions as with archery. Be especially sure to have plenty of room when you first try out the sport. An archery target is most convenient to use, but any type of target in which the arrows will stick may be used.
Do not allow children to use the throwing sticks unless under adult supervision. If you regard it as a weapon and use reasonable care, you will find it quite safe and will soon develop considerable accuracy. Continued practice will bring greater skill and increasing enjoyment in this unique and healthful sport.
Click here for the FULL SIZED VERSION of the image above. It is 93K, just so you know!
This article was originally online at a different location, but that website went down. Thanks to Robert Patrick for pointing this out to me and sending graphics, and to Matthew (MJR) for sending me the original article.
Atlatl Designs | Home
No comments:
Post a Comment