
This ia a throwing board from the Kotzebue Sound, an Inupiat Eskimo area in Alaska. The original, on display at the Sheldon Jackson Museum in Sitka, Alaska, is 15 1/2" long. It was possibly collected by Sheldon Jackson in the 1890s.
Material:
Wood, 16" x 2 1/2" x 3/4"
Construction:
- Cut the top side of the board (this is easier than cutting in from both sides). Starting 11 1/4" from the end, cut down at a slant to 7/8" from the bottom.

- Cut out the grip. The inset for the middle finger (the 1 1/4" wide space) is about 3/4" deep.
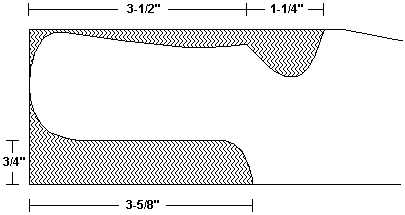
- Thin out the grip area for the other fingers. It is about 3/8" high at the edge, curving up to the line visible in the actual photo below. I used a chisel and a utility knife, and they work well for this thinning. Cut along the ridge where the depression ends with the knife, then chisel down to the proper level.
- Cut out the groove. Make it 3/8" wide where the peg goes if you can (I had to use a 1/2" chisel, so my groove is wider and farther from the tip). Follow the sides of the board, flaring it out. It should be 1/4" deep where the peg goes, rising up to flush with the top of the board about 7" from the handle end.
- Round off all the edges and sand smooth.
- Drill the hole for the index finger in the back. Only the tip of your finger goes in, so a 5/8" bit should work. The center is 5" from the handle end and just a little to the finger-grip side of center. Drill slanting back to the handle end. I prefer not to go all the way through, but several finger holes do run through the board (including on the original).
- Round off the edges of the finger hole and sand it down.
- If you want to stain or paint it, do it now, before you attach the peg. On my first one, I stained it with shoe paste wax.
- Make the peg. The original is a carved piece of bone or ivory, but those are hard to come by around here, so I just carved a block of wood into a peg shape and glued and clamped it in place. For my first board, I painted it white (to simulate the original) before attaching it.

The original
These are actually larger than the original, the photos are just a different size (and altering them makes them blurry).

My first copy

My second copy. This has been donated to the Sheldon Jackson Museum for their hands-on display.

This ia a throwing board from the Kuskokwim area of southwesern Alaska. The original, on display at the Sheldon Jackson Museum in Sitka, Alaska, is 16" long. It was possibly collected by Sheldon Jackson in the 1890s.
Material:
Wood, 16" x 2 1/2" x 3/4"
Dowel, 1/4" x 3/4" (throwing peg)
Dowel, 3/16" x 1 3/4" (finger peg)
Construction:
- Cut out the sides of the board. The end is 7/8" wide, and it's fairly straight for about the first three inches, then recurves out to the sides.

- Cut out the grip. The deepest part on the "top" is 3/4", tapering up to 1/4" from the top at the end.
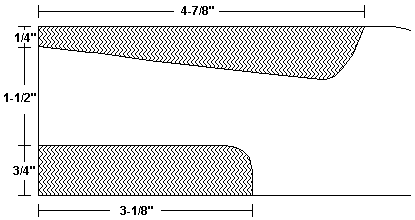
- Round off the tip and the handle grip.
- Thin out the finger rest. Work it down to about 3/8" high at the edge, up to flush on the thumb side.

End View
- Carve out the groove. Make it 3/8" wide where the peg goes if you can (I had to use a 1/2" chisel, so my groove is wider and farther from the tip). Follow the sides of the board, flaring it out. It should be 1/4" deep where the peg goes, rising up to flush with the top of the board about 10" from the handle end.
- Drill the hole for the index finger. I used a 3/4" drill and just went all the way through, and it's very comfortable for me. Drill whatever is right for your hand. I put the hole 5 3/4" from the handle end of the board, in the center, sloping down towards the back.
- Round off the edges of the finger hole and sand it down.
- Round off all the edges and sand smooth.
- If you want to stain or paint it, do it now before you attach the pegs.
- At the tip end of the groove, drill a 1/4" hole about 3/8" deep. Drill it at a 45 degree angle sloping back towards the tip.
- Take the 1/4" peg and round off one end. Glue the other end in the peg hole.
- On the side of the finger grip, drill a 3/16" hole. I did mine 3 3/8" from the handle end, but do whatever fits your hand. Drill in at a slight angle, going in about 3/4" deep.
- Simply glue the finger peg in place.

The original
Mine are the same size, just smaller photos.

My first copy

My second copy
For the hands-on display at the Sheldon Jackson Museum.
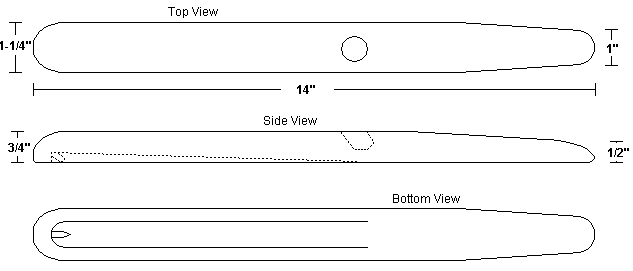
This is my (mostly theoretical) version of the Tlingit throwing board. The Tlingit live on the southeastern coast of Alaska, and I've seen images of 3 different throwing boards, but finally found the secret in pictures from the Smithsonian. They have a groove cut out on the bottom, and I assume there's a peg there, because a) throwing boards from that area usually do, and b) it works.
This is a QnD (quick and dirty) version, to give you an idea of how it works. The originals are beautifully carved and decorated, which I tried to do in my first two versions (and you can do on yours), but which is purely decorative and doesn't affect the function.
Material:
Wood, 14" x 1 1/4" x 3/4"
Dowel peg, 1/4" x 3/4"
Construction:
- 6" from the handle end, drill the finger hole. I was able to use a 1/2" diameter drill, going down about 1/2" (only the index finger tip has to fit in). Slant it back towards the handle end.
- Cut down the top of the handle. Starting about 5" from the handle end, slope it down to 1/2" high at the end (see the side view).
- Thin the handle sides. Starting about 4" from the end, taper them in slightly so that the end is about 1" wide.
- Round off the tip end.
- Round off all edges and sand smooth.
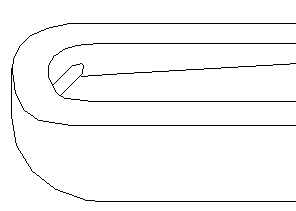
- On the bottom (the peg side), mark out lines starting 1/2" from the tip and 3/8" from the sides. Run them out to about where the finger hole is on top (seebottom view).
- Using a chisel, cut out the groove. It should be 1/4" deep at the tip (where the peg will go), running up to flush with the board at the end by the finger hole.
- Drill a 1/4" hole at the tip end for the peg. Make it at about a 60 degree angle.
- Round off one end of the dowel peg and place it in the hole. Make sure that it does not extend over the edge of the board. If it does, trim it down a little. The idea is to have the throwing board lie flat on the groove side.

A genuine Tlingit Throwing Board

My first attempt

My second attempt
To use this, you need to use light darts. Put the tip of your index finger in the hole, then place the dart on the peg. Grip it between your thumb and middle finger, with your other fingers gripping the handle. Throwing with this doesn't require much more than a wrist snap.

This is an arctic Point Barrow style throwing-board. The original was collected in Point Barrow, Alaska in 1883. The image is from "Throwing-Sticks In The National Museum" by Otis T. Mason, published by the Smithsonian Institute in 1890.
Here is the accompanying text:
Point Barrow type. The specific marks are the distinct handle without finger grooves, the very eccentric index-finger hole, the method of inserting the spur for the shaft, and the harpoon-shaft groove very shallow above and deep below. In the specimens collected by Mr. Murdoch there in great uniformity of shape.
Material:
Wood, 16 1/2" x 2 1/2" x 3/4"
Dowel, 1/4" x 5/8" long
Construction:
- Cut out the peg end. Starting 12" from the end, taper it down to 3/4" wide at the tip. At 9" from the end, it should be 1 1/2" wide; at 4 1/2" from the tip, it should be 1" wide.

- Cut out the handle. 3 3/8" from the end, cut in 1 1/2" on the high side and slant it up. On the groove side, cut in 1/2" and round out the end.
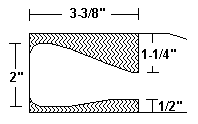
- Cut the groove. Staring 1/2" from the peg end, cut a 3/8" wide groove. At the peg end, it should be 3/8" deep, slanting upwards to flush at the grip. Center it at the peg end, slanting it over to 3/4" from the edge at the grip.
- Drill a 1/4" hole in the groove end, as close to level as you can. It's not critical, though.
- Round off the ends and edges.
- Round off the botton of the peg end.
- Drill the fingerhole. Make it 3/4" for a small finger, 1" for a large finger.
- Sand it all smooth.
- Round off one end of the peg. Put glue in the hole, insert the flat end, and push it in firmly.

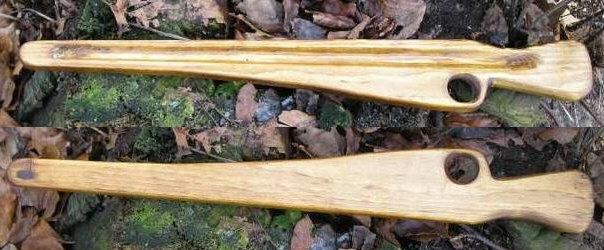
A Point Barrow throwing board made by Uwe, North Rhine-Westphalia, Germany.
Danke for letting me use the picture, Uwe!

This is another one where I found an image online, then tried to reverse-engineer it based on some common sense and a tiny bit of knowledge. Note that the original image below shows some curves to the side and groove that I didn't try to replicate.
Material:
Wood, 14" x 3 1/2" x 3/4"
Dowel peg, 1/4" x 1"
Construction:
- Cut out the rough shape.

- Drill the finger hole. It should be 7/8" in diameter, centered 3 1/2" in and 5/8" down from the upper left corner.
- Drill the thumb hole. It should be 1" in diameter, centered 2 5/8" in and 3/4" up from the lower left corner.
- Carve out the finger grips. Adjust them as necessary to make it comfortable for your hand.
- Carve the groove. It starts 2 3/4" in from the tip and is 1/4" wide. It is 1/8" deep for its entire length. From there it comes out and widens. The top edge (by the finger grips) is 1" down from the edge, and the groove is 1" wide at the end.
- Drill a 1/4" hole for the peg at the tip of the groove. Go about 1/2" deep and drill it at a 45 degree angle.
- Round off all edges and sand smooth.
- Round off one end of the dowel peg and glue the other end in place.
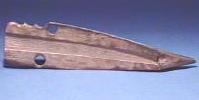
Original Image from the internet.
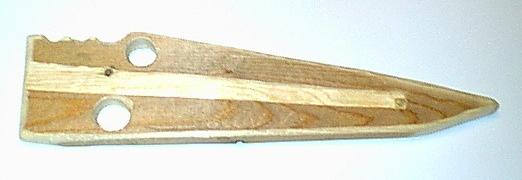
My Labrador Throwing Board
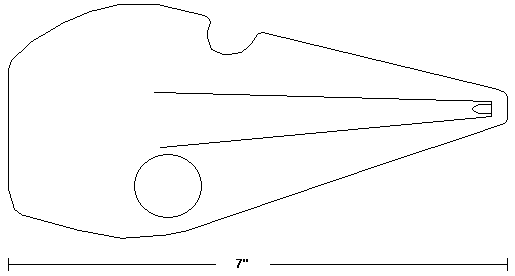
This is an Inuit throwing board from Port Harrison (now Inoucdjouac), located on the Hudson Bay in NE Quebec, Canada. It was collected in the early 1900s.
This is my attempt at figuring out a tiny image from the internet (g). As you can see from the picture at the bottom, the original throwing board isn't very large at all. I assumed the bird spear was 4' long, which makes the throwing board about 7" long.
Material:
Wood, 7" x 3 1/4" x 3/4"
Dowel, 3/16" x 3/4"
Construction:
- Rough-cut the block into shape as below.
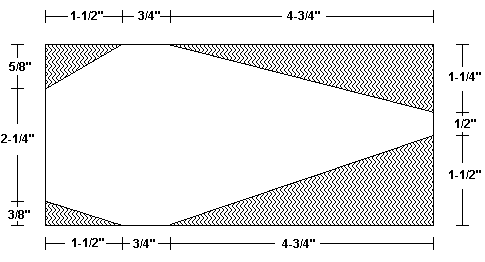
- Drill the thumb hole. The center should be 2 1/4" from the bottom end and 3/4" from the edge. Use whatever you need for your own thumb. I drilled a 1" hole, which works fine.
- Put your thumb through the hole and see where your hand fits over the side. Mark the location of your index finger and cut out a groove for it. Keep testing it as you work to make sure it's deep enough and comfortable enough when you hold the throwing board.
- Round off all the edges and corners.
- Carve the groove. Start it 3/8" from the end, and start it out 1/4" wide and 1/4" deep, tapering outward (and rising up to flush) at about the level of the thumb hole.
- The original seems to have small depressions for the other fingers to rest. I couldn't find a position that felt comfortable, so I left them out.
- Drill a 3/16" hole at the bottom of the groove. Try to make it about a 45 degree angle.
- Round off one end of the dowel peg, put glue in the hole, and fit it in.
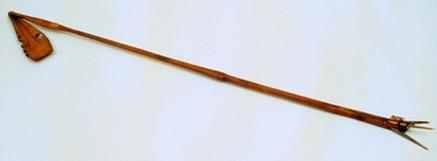
Image from Canada's Digital Collection, Hudson Bay Company
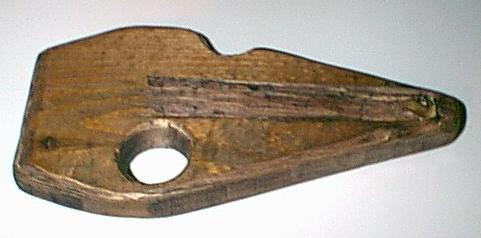
My Port Harrison Throwing Board

This is an arctic Anderson River style throwing-board. The original was collected at the Anderson River, Alaska in 1866. The image is from "Throwing-Sticks In The National Museum" by Otis T. Mason, published by the Smithsonian Institute in 1890.
Here is the accompanying text:
Anderson River type. The specific marks are the extreme plainness of form, the lack of accomodations for the thumb and fingers, excepting the eccentric index-finger hole, the poor groove for the harpoon shaft, and the absence of a hook or spur at the bottom of this groove...In another specimen seen from the same locality the shaft groove is squared after the manner of the Cumberland Gulf type.
Material:
Wood, 17" x 1 1/2" x 3/4"
Construction:
- Starting 6" from the handle end, slant it down to 3/4" wide at the peg end. Leave one edge straight.
- Cut the groove. Starting 3/4" from the peg end, cut a 3/8" wide groove. Make it 3/8" deep at the peg end, sloping up to 1/8" deep at the handle.
- Round off the ends and edges.
- Drill the fingerhole. Make it 3/4" for a small finger, 1" for a large finger, and slightly wider from side-to-side.
- Sand it all smooth.

Note: The original was a female atlatl (no peg). If you want to make it the authentic way, just leave out the peg.

This is an arctic Bristol Bay style throwing-board. The original was collected in Kadiak, Alaska in 1884. The image is from "Throwing-Sticks In The National Museum" by Otis T. Mason, published by the Smithsonian Institute in 1890.
Here is the accompanying text:
Bristol Bay type. In no essential character do these sticks differ from those of Nunivak. The handle is smaller, and they appear to have been made with steel tools.
Material:
Wood, 19" x 2" x 3/4"
(2) 1/4" dowels, 1" long
1/4" dowel, 5/8" long
Construction:
- 3 1/2" from the handle end, taper both sides down to 3/4" wide at the peg end.
- Shape the handle end.
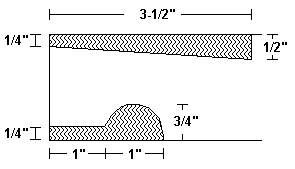
- Thin the bottom of the handle from the thumb and finger grips to the end. The sides should be 1/2" high.
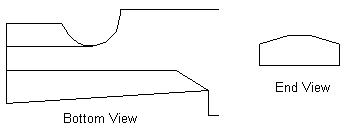
- At 1 3/4" and 2 3/4" from the handle, drill a 1/4" hole 3/8" deep.
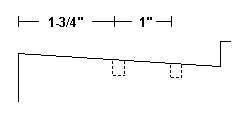
- Cut the groove. Starting 1" from the peg end, cut a 3/8" wide groove. At the peg end, it should be 3/8" deep, slanting upwards to flush at 13 1/2" from the peg end.
- Drill a 1/4" hole in the groove end, as close to level as you can. It's not critical, though.
- Round off the botton of the peg end.
- Round off the ends and edges and sand it smooth.
- Round off one end of the 5/8" peg. Put glue in the hole, insert the flat end, and push it in firmly.
- Glue in the fingerpegs.
- Round out between the fingerpegs and sand smooth.


This is an arctic Unalashkan (Southern) style throwing-board. The original was collected in Unalashka, Alaska in 1874. The image is from "Throwing-Sticks In The National Museum" by Otis T. Mason, published by the Smithsonian Institute in 1890.
Here is the accompanying text:
Unalashkan throwing-stick. It would be better to call this form the Southern type. The noticeable features in all our specimens are the parallel sides, the hard material, thinness, the carving for the fingers, but above all the reappearance of the eccentric cavity for the index finger. This cavity is not a great perforation, as in the Point Barrow type, but an eccentric pocket, a compromise between the Northern cavity and that of the East.
Material:
Wood, 17 1/2" x 1 1/2" x 1/2"
Wood, 3/4" x 1/2" x 3/8"
Construction:
- Shape the handle end. The wider grip is about 1/4" deep, while the shorter one is 3/8" deep.

- Thin the bottom of the handle on both sides from the finger grips to the end. The sides should be 1/4" high.

- Cut the groove. Starting 1 1/2" from the peg end, cut a 3/8" wide groove. At the peg end, it should be 1/4" deep, slanting upwards to flush at 10" from the peg end.
- 5" from the handle end, drill the fingerhole. Use a 5/8" bit and lean it sideways so the hole is 3/4" wide.
- Drill a 3/8" hole at the end of the groove, all the way through.

- Round off all edges and sand it smooth.
- Make the peg. Cut the smaller block into this shape. Taper the pointed part for the peg, and make the bottom completely round so it fits in the hole in the groove. Sand it all smooth.

- Put glue in the peg hole and insert the peg.


From "The Tribal Living Book"
Material:
Block of hardwood 15-20" long, 3" wide, 1" thick
Construction:
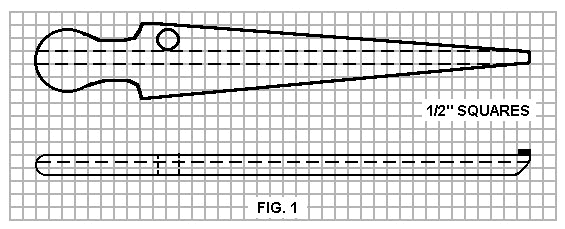
- Round off the ends and the edges of the block with your knife. Carve out the hand grip. You will want to carve an indentation on one side of the grip to fit the muscles of the lower part of your thumb, and notches on the other side to fit your middle, ring, and little fingers. (Note that the spear-thrower shown is right-handed.)
- Turn the spear-thrower over and, starting at the end opposite the grip, carve a long groove about 1/2 to 3/4 inch wide. It should begin about 2 inches in from the far end and be deep enough to pass through to the wood on the other side. Gradually taper it off near the grip end, until it runs flush with the surface.
- Turn the thrower over again and hollow out a hole for your forefinger at the other end. Cut a hole completely through the block, coming out on the other side which will hold the spear shaft. The spear-thrower is now finished, unless you want to add a coat of red paint in authentic Aleut style.
From "Popular Mechanics", 1936
Material:
Block of hardwood 19" long, 3" wide, 3/4" thick
Construction:
- To make a stick, cut a half-round or square groove 1/2" wide and 1/4" deep down the center of the wood stock, using a bench saw if one is available.
- Then shape the handle and bore a hole for the forefinger as shown in the drawing.
- Glue a small hardwood block tightly into the far end of the groove.
- After the glue has set, taper the stick to shape.

(Inuit Norsaq)

This is based on one I bought from Superior Kayaks in Wisconsin. It is very close in form to historical ones.
The throwing boards from Greenland (called a norsaq by the Inuits) are fairly unique among spearthrowers. Instead of having either a male OR female peg, they have two holes drilled into the body of the spearthrower, which correspond to two pegs attached to the shaft of the harpoon. This means you would not have to hold the dart at all to keep it steady on the throwing board, and would mean a different throwing technique as well (I haven't had a chance to actually throw a dart with one of these, so I can't tell you HOW it's different).
Material:
Wood, 18" x 3 1/2" x 1/2"
Construction:
- Taper both sides in so that it is 1 3/4" wide at the tip.
- Cut out the finger and thumb grips.
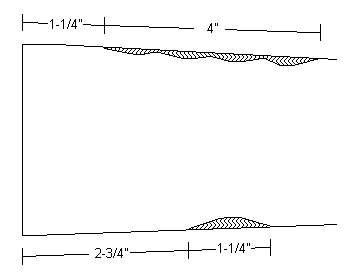
Starting 2 3/4" from the end on the thumb side of the board (decide for yourself which side this will be), carve out the thumb grip. It should run for 1 1/4" and should be about 1/4" deep in the middle. On the other side, starting 1 1/4" from the end carve out the finger grips. They should run for about 4" total.
- Cut out the groove. It is about 1" wide, but very shallow (only about 1/8" deep in the center). It starts in the center of the tip, but shifts over to the thumb side a little, with the edge 1" from the thumb side.

Handle End View of Groove
- Slope the sides of the top down about 1/8" on the edges.

- Round the bottom up to meet the sides.

- Drill the 1/4" pilot holes (to make an authentic one). The handle hole is in the center of the groove, located 1 5/8" from the end and drilled straight through. The one at the tip is in the center of the groove, starting about 1/2" from the end and slanting back at a 45 degree angle to the bottom.

- Round off all edges and sand it smooth.

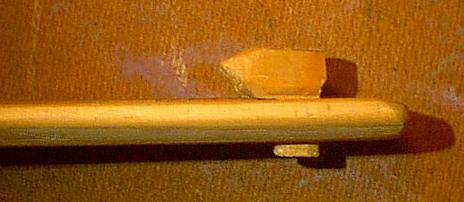
The one I bought was one of their deluxe versions, with delrin used to simulate ivory. At the tip, there is a large wedge of it inserted (because wood will split, ivory won't). There is also a plate of it across the bottom of the handle end and inside the hole by the handle. These were fastened in place by drilling small holes in from the side, then gluing in a piece of dowel, cutting it off, and sanding it smooth. There are 6 dowels holding in the tip wedge (3 on each side) and 3 across the bottom plate.
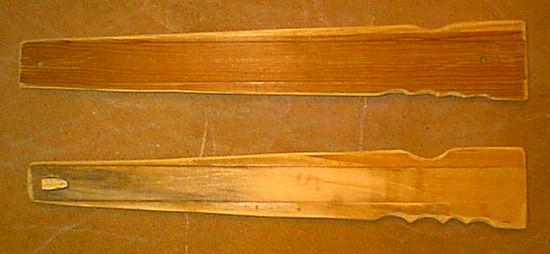
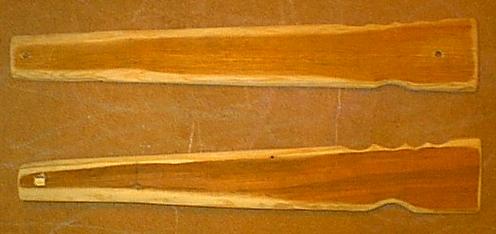
If you want one you can throw your normal darts with, though (as opposed to making up harpoons with holding pegs), you can convert it. Below are pictures of the boards I've made from this design with the top one having the pilot holes. The bottom, though, is a chimera. I stole the peg idea from the Unalashkan design from Alaska and made a separate peg for the end.

This one was made by Greg Miller, who sent me a picture of his design. His comments:
"I simulated bone/ivory with PVC. I heated it until it got soft then pressed it into place. After it cooled I trimed around the impression and voila. I’ve also had success using dominoes as fake ivory."
Looks great to me! Thanks for sending the picture, Greg!
This was from a kayaking board on the internet. Since I never know how long those are going to stay online, I've put the information here, as it originally appeared. I sent Kent LeBoutillier the plans for my norsaq (throwing stick), and he created a webpage athttp://www.geocities.com/kentsyaks/Norsaq.htm . He is using laminations to create a quite beautiful object, while my mine are made of solid wood. I would ignore the angles shown at the right, and just create the same basic shape. My norsaq was borrowed by two Greenland competitors, for the rolling competition, so that is some assurance that it is fairly close to an acceptable variant of a West Greenlandic throwing board. Make the width comfortable for you to grip and feel free to alter all of the dimensions. My newest norsaq is about an inch longer that that shown in the diagram. An actual throwing stick has two holes in it, to allow it to be held tightly to the harpoon shaft, and provide a connection to the harpoon for transmitting the force of your throw. These are not shown in the diagram. The holes are often reinforced with bone. The image at left shows one method of using a triangular piece of bone for the reinforcement at the narrow end of the stick, that receives the most stress. The reinforcement goes all the way through the norsaq (the triangular shape is visible on the bottom), held in place with wood or bone pegs (Maligiaq also uses glue). Note that for throwing a harpoon, the wide edge is held, using the finger cutouts. For rolling most of the Greenlanders that I have observed hold the narrow end, or hold the norsaq in the middle. The channel on the underside allows a harpoon shaft to nestle against the norsaq. For rolling it also gives you a secure finger grip, and I recommend cutting the channel even if you aren't going to be throwing a harpoon. Good references containing diagrams of variations on the throwing stick and harpoons, can be found in H.C. Petersen's "Skinboats of Greenland" and Scavenius P. Jensen's, "DEN GRONLANDSKE KAJAK OG DEN REDSKABER" (Danish). The latter book is out-of-print, but is sometimes available on book searches of used book dealers. Greg Stamer 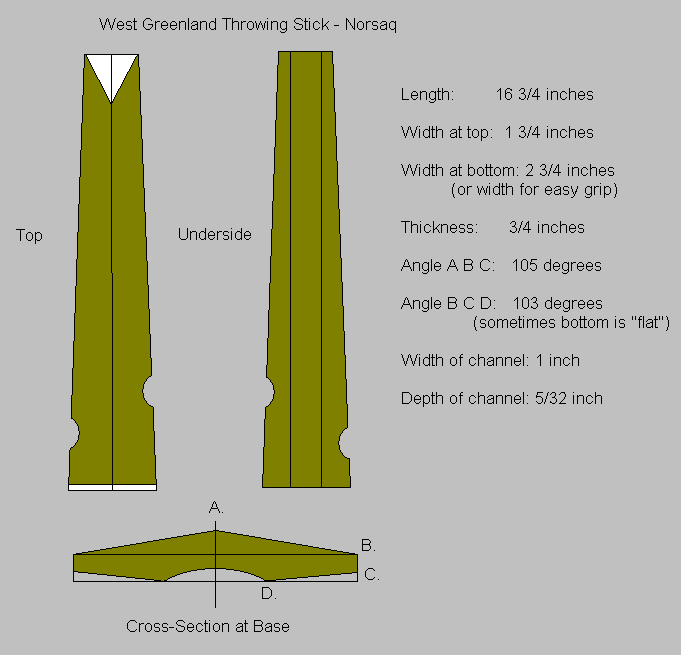 |

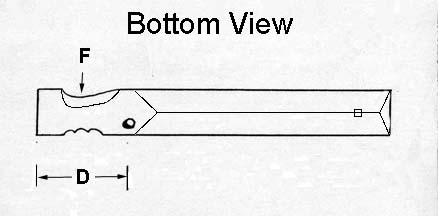
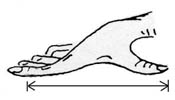
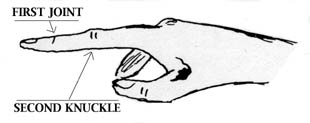
A. The length of an Aleut Throwing Board is set by the individuals hand size. Stretching one's thumb and index finger along the top side of the throwing board twice and then adding the distance from the tip of the index finger to the *second knuckle gives you the perfect size board for your own hand.

C. The same three fingers width is what determines the location of the socket from the end of the board. The peg/notch that fits into the socket is made from hard bone, ivory, or plastic. The design of the peg/notch depends on the type of dart/harpoon you use.
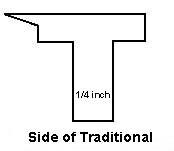
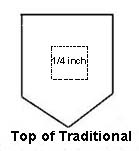 Peg Views
The finger hole is drilled to the side of the slot/groove. The finger hole is drilled at an angle so that the finger can enter it comfortably. Drill the finger hole from the top of the board.

G. The handle end of the board has a small angle to it starting from just above the finger hole to its handle end. This 6 to 8 inch section of the board should be planed or sawn so that a wedge is removed. The wedge is about 1/4 to 1/2 inches thick at the end of the board and flush to the boards surface by the finger hole.
 Side View of Aleut Throwing Board
*
Information complied by Jim Dickson from Emil Berikoff with graphics
by Jim Dickson and Ray Hudson.
Please contact me if you intend to use this information, or if you have any additional information.
Home
- VOLCANO OBSERVATORY -|- UNALASKA CITY SCHOOL -|
|- Williwaw Weather Links -|- Unalaska Methodist Church-|
|-MUSEUM OF THE ALEUTIANS - |- UNALASKA VISITORS BUREAU-|
|-WORLD ATLATL ASSOCIATION -|- HOLY ASCENSION OF OUR LORD CATHEDRAL UNALASKA-|
|-UNIVERSITY OF ALASKA FAIRBANKS -|-CITY OF UNALASKA -|
|-MUSEUM OF THE ALEUTIANS - |- UNALASKA VISITORS BUREAU-|
|-WORLD ATLATL ASSOCIATION -|- HOLY ASCENSION OF OUR LORD CATHEDRAL UNALASKA-|
|-UNIVERSITY OF ALASKA FAIRBANKS -|-CITY OF UNALASKA -|

No comments:
Post a Comment