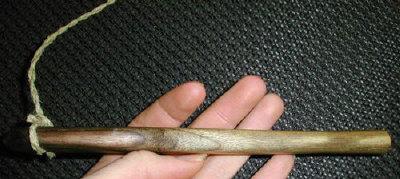
I have not gotten their permission for this yet, but am trying to do so. The original page is here. The Speerschleuder 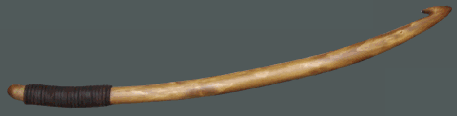 A speerschleuder serves as an extension of the throwing arm, increasing power and distance. Wood is the most suitable material for it, if you want to replicate prehistoric models. A rusty nail crosswise through a roofing slat is not a safe solution. Suitable wood is easily available. The branch should be light and durable with a length of 50 to 70 centimeters (19.5 - 27.5 inches). A diameter of approximately 30 to 40 millimeters (1 - 1.5 inches) fits well in the hand. In my opinion, ash is probably the best wood to use for a speerschleuder. Heavy hardwood, such as beech or oak, should not be used. To start with, hazelnut wood would also work. A speerschleuder can be made in a number of ways. The hook can be an insert made of horn and the handle can be covered with leather straps. The basic prehistoric hook ends are beautiful small works of art. There are multiple animal representations, like a wild horse. They almost look as though they grew that way from a single antler. Here is my first speerschleuder, carved from a single piece of wood. As you can already see, this area contains a number of possibilities for experimentation, which get even larger when you begin building the speere. | |
For speerschleuders with a simple carved hook, I prefer a naturally curved branch. The thicker end should be the hook end, with the thinner end for the handle. The reason for this is simple. In order to carve out the hook, a lot of wood must be removed from the branch. Doing this to the thinner end would make the cross section too weak. After removing it from the tree, the branch must be carefully shaped and dried so it does not split (as I found out, trying to carve one too soon). Using a sharp tool, shave both sides of the branch going back to the thicker end so it ends up only as wide as the thinner end (see Figure 1). | 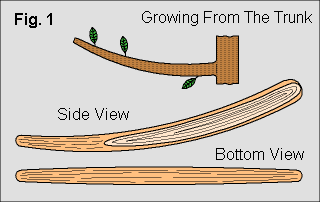 |
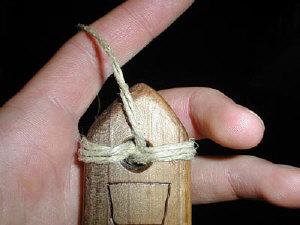
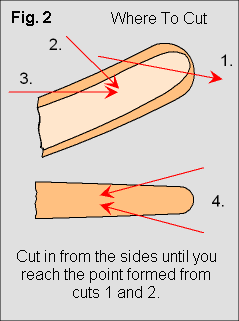 | Rough-cutting the the hook only takes a few cuts (Figure 2). Afterwards, you can use a knife to round and taper the end. With a round file, smooth out the notch under the hook (Figure 3) and finish shaping and smoothing the hook with emery paper. Finally, the entire speerschleuder can be sanded and afterwards should definitely be oiled. Simply dip a rag in the oil of your choice (shank oil, linseed oil, shoe polish, etc.) and apply it to the wood, wiping off any excess. This will prevent the wood from drying out and cracking and will keep moisture from getting into the wood. |  |
Wrist strap: this speerschleuder is made without a wrist strap. If you have a problem with it flying out of your hand when you throw, at least the speere goes flying first (...and perhaps this is how the Aborigines invented the boomerang? ; -) ). If the speerschleuder is fastened to your wrist, it may strike you in the kneecap (or even worse) if you accidently let go while you throw. 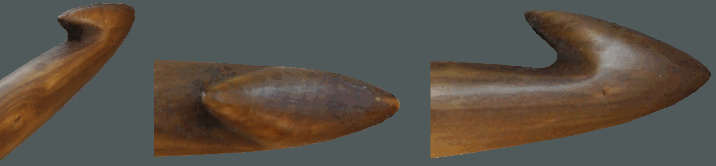 | ||
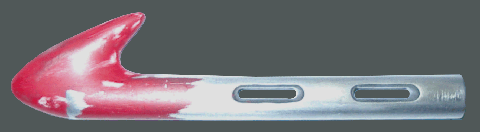
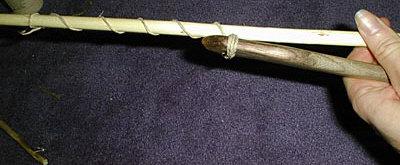
I have not gotten their permission for this yet, but am trying to do so. The original page is here. Speerschleuder with Attached Hook  The speerschleuder illustrated above consists of a shaft of white thorn wood with a separate hook made of synthetic resin. Usually the hooks are carved from horn or ivory, but since I don't have access to these materials and/or they are very expensive, I decided to make one out of synthetic resin instead. I realize that not many people have the means to make a hook by this method, but I would still like to show how it is done, since more hooks can be made whenever they are needed without any variations. The resin I used is normally found in professional construction (foundry) use. It is durable and flexible, and without adding any dye it reminds me of ivory, which is what I wanted. | |
 | First, a model must be made. The one I made consists of an aluminum shank and an upper hook formed out of model lacquer (which works like fine putty). The long holes are milled in. |
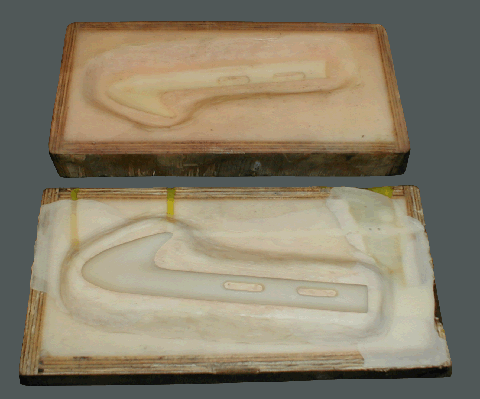 | From this model, the first half of a negative is poured. The material for this could be gypsum, which is very inexpensive, but not very accurate or durable. Synthetic resin is much better for this. After the first half hardens, the second half can be poured as well. After that hardens, the two halves are separated and your model is formed. You will need to do some fine work on the mold to smooth out any rough spots, and small channels will need to be drilled so air can escape (in this case, I drilled through to the peg, with the fill hole at the end of the shank). The mold is now ready for production. In the picture you can see a blank in the lower form which has already been poured (the yellow veins are Plastilline plugged air ducts from preliminary tests.) |
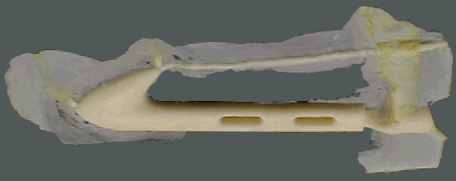 | After 24 hours the hook can be removed from the mold. There will be a thin burr running around the hook where the molds were joined. You can see the fill hole at the end of the shank and the air escape hole leading from the peg. |
 | The thin burr is simply snapped off and the fill plug is removed with a knife. |
 | The remaining burr is scraped off with a knife blade and polished with fine emery paper. After a 'cure time' of two more days the hook is ready for use. For strength and stability, the cross section is a slight oval (14 mm high, 12 mm wide). The long holes are on the upper half of the shank so that it can sit deeper into the wooden shaft. |
 | The receiving end of the wooden shaft is milled and shaped with a suitable tool. A Dremel works great. |
 | As you can see in this picture, I went down a few millimeters into the wood to allow the shank of the hook to lie deeper. I then made some shallow grooves across the bottom where the leather lacing will go to keep it from slipping. |
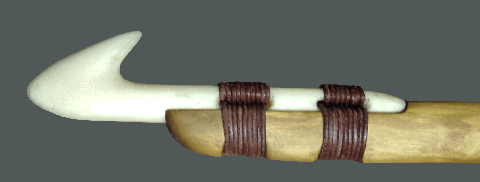 | The bottom of the hook's shank was roughed up with a rasp and glued into place with two-part epoxy. This guarantees a firm and secure seal to the wood. |
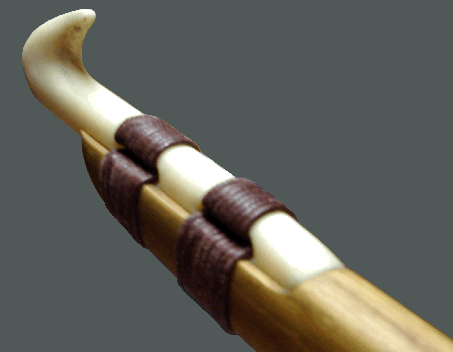 | The lashing for the hook consists of two leather lashes, about 1/16" diameter and about 3 feet long. The leather I used for the handle was about 1/8" square by 6 feet long |
Note: If you don't have the means to make a resin hook, one carved from hardwood (such as beech or maple) will also work. By using different woods, varying the attachment of the hook, and trying other changes, a very pleasant effect can be achieved. | |
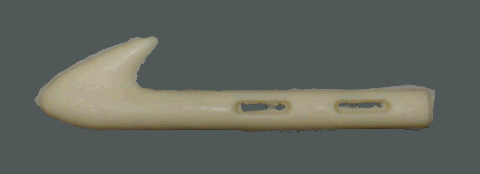
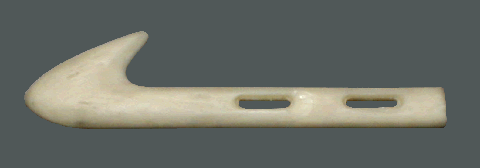
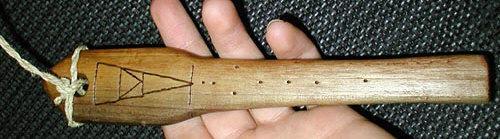
The "Baton de Commandement" is an artifact found at some French sites. There have been theories about it being a spearthrowing tool, but until this set of posts on the Paleo board, I hadn't heard of anyone actually trying it out. The text is all from posts by Ehkahk (Paul), and is reprinted pretty much verbatim with his permission. It's from a number of different posts, with the headers clipped out. Paul says the original idea for his design and testing came from and article by Paul Comstock in "Primitive Technology: A Book of Earth Skills".
Material:
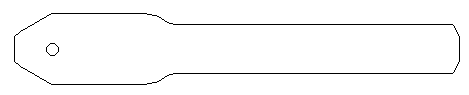
Wood, 8" x 1 1/2" x 3/4"
Leather thong or cordage
Construction:
- Cut out the outline, rough out the edges, drill a hole through, and sand it smooth.
|

| Die Speerschleuder |  | |
Eine Speerschleuder dient der Verlängerung des wirksamen Hebelarmes, um Wurfkraft und -weite zu vergrössern. Holz ist der dafür am besten geeignete Werkstoff, falls man sich in etwa an prähistorische Vorbilder halten möchte. Ein rostiger Nagel, quer durch eine Dachlatte geschlagen, ist mit Sicherheit keine Lösung. Geeignete Holzarten sind in grosser Auswahl vorhanden. Der Ast sollte leicht und stabil sein und eine Länge von 50 bis 70 Zentimetern aufweisen. Ein Durchmesser von ca. 30 bis 40 Millimeter liegt gut in der Hand. Meines Erachtens ist Esche als Speerschleuder bestens geeignet, vermutlich wird es nur durch Eibenholz getoppt. Schwere Harthölzer, wie Buche oder Eiche sollten nicht benutzt werden. Für den Anfang tut es sicherlich aber auch ein Haselnuss-Ast. | ||
Eine Speerschleuder lässt sich in vielfältiger Ausführung fertigen. Das Hakenende kann aus Horn eingesetzt werden, der Griffbereich kann mit Lederstreifen umwickelt werden. Gerade die prähistorischen Hakenenden sind wunderschöne Kleinkunstwerke. Vielfach sind es Tierdarstellungen wie z. B. Mammut oder Wildpferd. Es sieht so aus, als wären sie aus einem sich gabelnden Geweihstück entstanden. In dieser Bauanleitung zeige ich mein Erstlingswerk (siehe Titelbild), eine aus einem Stück geschnitzte Speerschleuder. Wie ihr schon jetzt unschwer erkennen könnt, enthält das Thema schon jetzt eine Menge Möglichkeiten zum Experimentieren, die sich durch den Bau der Speere noch vervielfältigen werden. | ||
Bei chleudern,die einen geschnitzten Haken am hinteren Ende bekommen werden, bevorzuge ich einen leicht gebogenen Ast. Dabei sollte das dickere Ende für den Haken, der dünnere Bereich dementsprechend für den Handgriff vorgesehen werden. Die Erklärung dafür ist einfach. Um den Haken auszuformen, muss am Schaft viel Material abgearbeitet werden. Das dünnere Ende wäre danach im Querschnitt zu schwach. Nach dem Abschneiden vom Baum muss der Ast sorgfältig entrindet und, damit das Holz keine Risse bildet, schonend getrocknet werden. (Ganz Eilige, wie ich, fangen sofort an zu schnitzen). Der Ast wird mit einem scharfen Messer vom dünneren Ende aus nach hinten an den beiden Seiten abgeflacht. (siehe Abb. 1) Das Auskerben des Hakenendes erfolgt mit ein paar Schnitten. Danach wird der Schaft mit der Messerklinge zum Hakenbereich hin schlanker und rund geschabt und das Hakenende nach hinten verjüngt. Mit einer Holzraspel oder Feile (rund, bzw. halbrund) kann der Schaft und das Hakenende anschliessend feiner ausgeformt werden. Am Ende erfolgt ein mehrmaliges Schleifen mit immer feiner werdendem Schmirgelpapier. Zuletzt kann das Holz mit Holzbeize getönt werden und sollte danach aber auf jeden Fall imprägniert werden. Das funktioniert durch Auftragen von ausharzenden Ölen, wie Schaftöl oder Leinöl, Schuhcreme, Bienenwachs, usw.. |  | |||||||||||||||||||||||||||||||||||||||||||||||||||||||
Ein Tipp zum Schluss: Verzichtet bei eurer Speerschleuder auf ei |  
| |||||||||||||||||||||||||||||||||||||||||||||||||||||||


No comments:
Post a Comment